Believe it or not, cleaning a carburetor is a task that most people can do by themselves. If you want to save some cash, cleaning your carburetor on your own is your best option. In this post, we will teach you a step-by-step guide for how to clean a lawnmower carburetor.
If this is your first time performing this kind of maintenance, we recommend taking photos of how each component is attached before taking them apart, so that you can be sure to reassemble them correctly afterward.
Step by step guide for how to clean lawn mower carburetor
Safety first
Any repair work you do requires proper protection and safety precautions. Carburetor maintenance involves coming in contact with old fuel, which is noxious. Always work in a well-ventilated area.
Whenever you’re working in a garage or workshop, remember to open the doors and windows. If you can afford the cost, it’s also a good idea to invest in a ventilation fan to use whenever you’re performing maintenance work in a garage. If your work area doesn’t have enough ventilation, you need to choose another spot to ensure your safety.
Determine if the carburetor is indeed the culprit
Oftentimes, people are quick to jump to conclusions when diagnosing problems related to machinery. For example, small engine owners tend to attribute issues to a bad carburetor when the real problem is actually less complicated.
Before deciding that the problem is with the carburetor, check the following first:
- Is there enough fuel in the lawnmower?
- Is the ignition switch in the proper position?
- Is the spark plug attached properly? Is it dirty?
Take off the outer casing and air filter
The way you do this will depend on your specific lawn mower model. Generally, you’ll need to remove the screws and the outer panel to access your mower’s interior. Then remove the air filter to gain access to the carburetor.
Ensure that your air filters are clean and devoid of debris. When they are dirty, they produce black smoke that flows from the exhaust. As a result, the carburetor doesn’t get enough air to work properly.
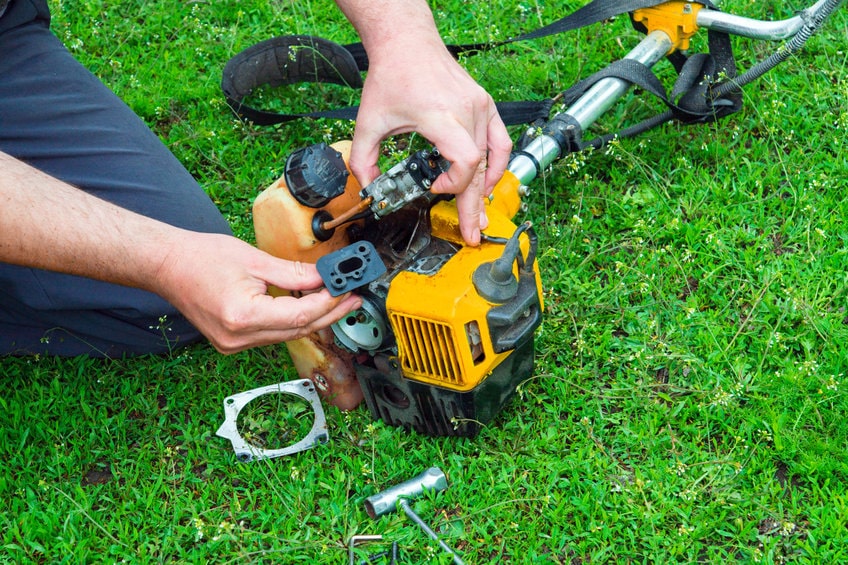
Unbolt and remove the carburetor
Although the carburetor is usually bolted firmly, you should be able to remove it fairly easily. With a nut driver, unbolt it and then ease the fuel line. We recommend preparing something that will catch the fuel as it spills out.
If no fuel exits the line, this is an issue. There might be some blockage within. Check if the fuel line is clear.
Unbolt the bowl of the carburetor and clean its nut
A nut firmly holds the carburetor bowl. Before unscrewing it, use a carburetor cleaner to clean the area. Unscrew the nut to remove the bowl. Since it’s a jet with a hole, ensure that there are no blockages.
To do this, simply poke it with something thin like a paper clip or a wire. Even small debris within the jet can stop your carburetor from working properly. In most cases, cleaning the hole out will fix the problem.
An old gasket might also get stuck to the nut, so just scrape it off. Once done, spray it with a carburetor cleaner.
In cases where the bowl is already damaged or very dirty, it’s better to just replace it.
Replace the needle
Upon removing the bowl, you’ll find the float is connected to the carburetor with a pin. Take out the pin and replace the needle.
Once you remove the bowl, you will see the float attached to the carburetor with a pin. Remove the pin and replace the needle.
Remove dirt deposits from the carburetor with a cleaning fluid
When there’s dirt inside the carburetor, the fuel and air passages are blocked, messing up the performance of this component.
Carburetor cleaners come in a spray, enabling you to clean the interior and exterior parts of the carburetor easily.
After removing all parts of the carburetor, spray them with the carburetor cleaner. Use a paper clip or wire to remove all the dirt inside the carburetor’s holes and ensure they’re free of debris.
Replace the gasket
Inside the carburetor, you’ll find a small gasket where the needle is placed. Remove it and fit it with a new one.
Check the carburetor settings
After cleaning the carburetor, determine if there’s anything that requires adjustments. This is important because you might have opened up some wires that are crucial for your carburetor to work properly.
Get a flashlight to check if everything is fixed correctly. When you finally start the engine, it should run smoothly without any shaking sound.
Reassemble and reattach
Take a look at the photos you took to help ensure that you put everything back in the right place. Add some fuel and start the engine.
By following this guide for how to clean a lawnmower carburetor, you should be able to fix the problem on your own. But if you’d rather leave it up to the professionals, contact Greg’s Small Engine today!